Tuesday, January 14, 2014

HOW TO SAVE IN PHOTOSHOP LAYERS...


Adobe Photoshop

This Blog is exclusively for beginners.
I have given a subtitle "Beginners' Beginner"
(for among the beginners on Photoshop to the very first timer beginner) 
And I've given the best for Beginners to understand fully each movement on one subject meter. Thus I have fulfilled the shortcomings I faced while I was a novice.


BEFORE YOU TOUCH  HOW TO SAVE, 
PLEASE GO TO  MY FIRST GRAPHIC


SAVE...
HOW TO SAVE...
SAVE LAYERS IN PHOTOSHOP...
SAVE  VS SAVE AS
HOW TO SAVE AS IN PHOTOSHOP...
WHAT IS SAVE?
WHAT IS SAVE AS?

To Save Just Click the Save button to save your image or any graphics you have done in the Document Photoshop. But...


What happens to that data when you click Save?


'Save'  in general (In Computers) you move or copy your temporary data to a more permanent area in your computer or to a storage medium.

When you edit a File in Photoshop document (word-processor/ applications programs) that particular program ( in our case The Photoshop)  copies the entire file, or portions of the file, into an area of main memory called a buffer 


Any changes you make to the file are made to the copy in the buffer not to the real file on the disk. 


The buffer is temporary -- as soon as you exit the program or turn off the computer, the buffer disappears, so do the copied data. 


Before  Layers and data disappear you must do the needful to automatically or manually to store those data in appropriate place in your computer. 


To record your modifications to the file on the disk, you must save the file. 

On you do this, the program copies the contents of the buffer back to the file on the disk, replacing the previous version of the file.


Because computers can break down or for some-or-the-other reasons if the power breaks down  at any moment, it is a good idea to save your files periodically. Otherwise, you will lose all the work you have done during an editing session. 


Many applications automatically save files at regular intervals. 

*But prior to CS 6 there's no such automatic saving facilities in Photoshop. 

But in Photoshop not like in other programs  the History Panel plays a vital roll: When you carry out a series of actions in Photoshop, you may want to undo them. Here the history panel enable you to save all the actions that carried out before you turn off your program..

The history is in the temporary file , and that file hangs around until you close the program.


You no longer have to wait for the progress bar to creep across your screen when saving large files because Photoshop CS6’s  Background Save feature can save files in the background while you keep working on other projects.


*AUTO SAVE NEW FEATURE IN PHOTOSHOP CS 6
Auto Save, another new feature of Photoshop Cs6,  can help recover your file if your computer crashes before you've had a chance to save. To select the time interval for automatically saving your files, select Preferences > File Handling and choose from every  5, 10, 15, 30, or 60 minutes. These features are on by default.
  

Before you learn How to save in Photoshop do some simple graphics in Photoshop,  please try the following graphics for Beginners.

HOW TO MAKE A PHOTOSHOP BANNER

Create a banner   Step by step tutorial...


HOW TO SAVE IN PHOTOSHOP
Why to save?


HOW TO SAVE A PHOTOSHOP DOCUMENT
 HOW TO SAVE FINISHED FILES PHOTOSHOP

http://www.makeeart.com/blog


HOW TO MERGE LAYERS PHOTOSHOP


Adobe Photoshop
Adobe Photoshop is a graphics editing program developed and published by Adobe Systems its used by professionals, experts and novices alike.  


HOW TO MERGE LAYERS… 
Sometimes, we feel the need to combine or merge different layers together...


Before YOU learn merging layers go to :PHOTOSHOP GRAPHIC DESIGNING FOR BEGINNERS step by step tutorials.

MY FIRST GRAPHIC- FOR BEGINNER
 HOW TO DO A PHOTOSHOP BANNER...
  HOW TO DO A WEB BANNER
  HOW TO DO AN Ad BANNER


WHY MERGE LAYERS? 
WHAT MERGE LAYERS MEAN IN PHOTOSHOP? 

Merging layers a very very simple process in Photoshop...

Merging layers helpful when you no longer need every layer to be independent.

Layers in Photoshop allow you to work on one element of an image without disturbing the others, so they are an indispensable tool.
We consistently use layers while working in Photoshop.


Sometimes, we feel the need to combine or merge different layers together - either to work on the merged image, or to flatten all layers to form a single layer.

Let’s say we are done working with layers and we want to  create a composite and want to consolidate it to one layer instead of having many separate layers.  This can be simply called “Merge”

To keep this MERGER-thing in your mind (until we acquaintance with) just think of a commercial Merger, (usually with a mutual decision between two firms, two companies become one). Here in Photoshop its combining some finished layers in to one layer,

To make  all the changes we made into that layer. (To clear yourself and to understand well  go further down in this page) 

How to Merge
The Merge Layers command is available by doing one of the following, after *highlighting the layers you want merged:
      
§  Right click on one of the layers and select Merge Layers
§  Go to the ‘Layers’ menu and select Merge Layers
§  The keyboard shortcut Ctrl/Cmd + E (this is actually the same shortcut as Merge Down)
                   *highlight= Click on one layer(other layers u prefer to highlight)  Ctrl+click
Caution: once layers are merged, there is no going back!! the layers are inseparably connected.
The following is an sample a Banner - Taken as an example: 
This banner contains 8 stacks of separate layers independently laying  down for a facial makeup. 
A complected banner after Merged and Flatten                          
  
See :  Fig-2 to Fig-10
(how layers are separately layered before - Merge)

  
   Fig-1


The Background Black Layer                             Fig-2


     A Grident Layer Merged with background.       Fig. 3


    Boarder Layer                                                   Fig-4


    Typed Text Layer                                                        Fig-5


         Text (Effects)                                             Fig 6                                


      Text Effect                                                             Fig-7

Fig 6+Fig 7 Highlighted  Before Merged
Fig-8

*highlight= Click on one layer(of the layers u prefer to highlight)  Ctrl+click

 After, to be Merged Layers Highlighted go to > Layer Menu > Merge Layer (to Combine the layers which  you decide make into one layer.)
    Fig-9


  Right click on one of the layers and select Merge Layers
§  Go to the ‘Layers’ menu and select Merge Layers
§  The keyboard shortcut Ctrl/Cmd + E (this is actually the same shortcut as Merge Down)

Now both of the Layers are Merged in the Fig-10 Image

Fig-10


Fig 11


This is a very simple process but some times for beginners its annoying, just to make things clear I have done in details, This tutorial is solely done for Beginners Developing Graphic Designers in mind.  


Now  Finished ? not yet

Your Project Layers are layered out  Independently.
This way how to go further....

Now you got  two important things to do.
Saving the Project
Flatten Layers
Please Note - I have give first Saving then Flatten
This is again a simple process but you need some elaboration.
Since we are Beginners DEVELOPING GRAPHIC DESIGNERS.

HOW TO DO A PHOTOSHOP BANNER...

http://www.makeeart.com/blog


PHOTOSHOP SIMPLE DESIGNS


Adobe Photoshop
Adobe Photoshop is a graphics editing program developed and published by Adobe Systems it's used by professionals, experts and novices alike.  

GRAPHICS FOR BEGINNERS' BEGINNER 

Tutorial Photoshop, for Beginners...

PHOTOSHOP FOR BEGINNERS... 
HOW TO DO SIMPLE OBJECTS... 

BEGINNERS PLEASE GO TO , MY FIRST GRAPHIC


Rotating Blades- Photoshop


CS5
OPEN PHOTOSHOP
.

If you know what is 'CS' in Photoshop much better, It stands for  "Creative Suite" read a bit of CS series Photoshop.  

In late 2003 Adobe upgraded there popular Web, Graphic & Print applications aimed at 'creative' professionals. Standalone applicationsfrom these areas took on this new branding. Photoshop 8 became Photoshop CS.
(Illustrator 11 became Illustrator CS, Golive 7 became Golive CS, Indesign 3 becomes Indesign CS.)


Fig.1


Fig.1 -  I have taken  Preset (setting) to Web, you can set your own setting.
                                       PRESS ARROW ON THE LEFT CORNER  (PRESET)

                                         If you are not going to post on the Web, you can Customize you setting .


BACKGROUND COLOR

           Background Contents if you set to Color - (black) straight-away you will get a black background                  Canvas.

HERE I HAVE TAKEN Transparent: 
Fig2


Go to Paint Bucket Tool > Click 


Fig 3


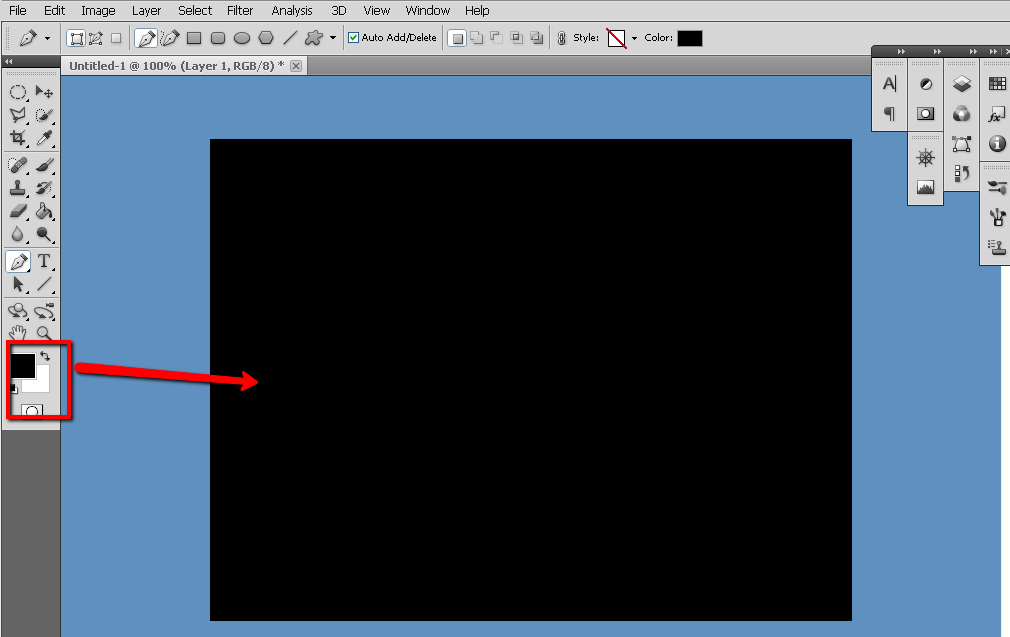
Note : Here the foreground Color is black


Fig 4


NOW ITS TIME TO START YOUR GRAPHIC - THE HAND WORK


NOW YOU ARE GOING TO WORK ON PEN TOOL 

PEN TOOL


SHAPE LAYER

SHAPE LAYER

When you Click PEN TOOL the Option bar pops up on the Top
 Select Shape layer option.


Photoshop gives us six Shape tools to choose from – the Rectangle Tool, the Rounded Rectangle Tool, the Ellipse Tool, the Polygon Tool, the Line Tool, and the Custom Shape Tool.

The Shape Layers Option

Before we start drawing any shapes, we first need to tell Photoshop which type of shape we want to draw,  Photoshop actually lets us draw three very different kinds of shapes –vector shapespaths, or pixel-based shapes.  Unlike pixels, vector shapes are resolution-independent and you can scale fully, which means we can make them as big as we like and re-size them as often as we like without any loss of image quality. The edges of vector shapes will always remain crisp and sharp.
In this tutorial we are about to use Vector  (Shapes or Drawings -  A Fan blade SHAPE).
To draw vector shapes, select the Shape Layers option in the Options Bar. It’s the first of three icons near the far left (the Paths option is the middle of the three icons followed by the Fill Pixels option on the right):

Selecting the Shape layers option in the Options Bar in Photoshop. Image © 2011 Photoshop Essentials.com


What Shape Tool can do...?

With the Shape Layers option selected, the next thing we need to do is choose a color for our shape, and we do that by clicking on the color swatch to the right of the word Color in the Options Bar:
Selecting a color for the shape in Photoshop. Image © 2011 Photoshop Essentials.com
Now Change the Color to your preference, I selected ( White ) The blades color.


just get the middle (no need exactly) 


VECTORS
Vectors are lines, whose curvature, thickness, and length are determined by mathematical formulae. You don’t need to know any math; it’s all done for you. If you want a shape like a circle, your job is to simply draw the circle; Photoshop defines the center point and the radius to create a circle. At that point, you can specify the circle’s color, line thickness, and so on. 


Fig 5

Click in the  middle with the pen selected  go right up click with-in the Canvas or even you can go out and click (here you'll not get a edge)  click again to your  'right'  (about 3/4 inch) as indicated by red small butterflies.  
Now your first blade is set.

Don't forget to hit Enter.

If gone wrong ; no worry, 
Go to Edit and undo, 
delete all and redo, 
or try Esc and see whats the results is. 
Study well the changes for each activity. 
Practice, Practice and practice well 

Fig 6

Now the LINES AROUND THE SHAPE  gone.
A White shaped pointed Vector path created (a Hand Saw like object)

Now if you have a look on your Layer palette, it will look like the Diagram bellow.

(unlock the locked layer  if any)
To unlock double click on the locked layer, on the pop up flyer give  OK.
or click on the lock icon top of the layer palette.


 Go to Move Tool...
 Click Move Tool (V)
'Check' Show Transform Controls.


 Don't forget to take a look at the Layer Platte. 

If the vector mask not clicked (the Thumb nail; squire, dark beige on the top layer next to the White, small square)   the blade will not be selected,  instead the black Canvas in the background  will be selected by "Transform Controls tool". 

This is the most vulnerable spot.

LETS START ENABLE THE FAN BLADE TO SPIN.

Once the Move Tool is Clicked on the Tool Bar,

 a new  Menu Bar with SHOW TRANSFORM CONTROLS box will be opened. 

TICK the small box on the left of  
"Transform Controls box".
Fig 7


Once you tick the TRANSFORM CONTROLS box,

a square box with 8 handles will surround the shape: 

your blade shape


Fig 8

Lets the middle center point snaps in place. 
CLICK ON THE LINE OF THE transformation box TO ENABLE the following tools in Fig.9
Set the ROTATION POINT to 20.00° (20 degrees)
Hit Enter
The shape will fall down to  20.00° point.
.
ITS WORKING!!!!!!!!!

Fig 9

               HIT ENTER AGAIN;
               HOLD Ctrl + Alt+Shift  and  Hit 'T' repeatedly,  
               until you form your desired point...
               End with Esc. to deselect selection.


Fig 10


Fig 11


IN A NUTSHELL:
1.SELECT PEN TOOL
2.GO TO THE DOCUMENT , CANVAS
3.IN THE CENTER; CLICK THE FIRST POINT, SECOND AND THIRD POINTS AS SAID                                           ABOVE.
4.WHEN THE SHAPE IS FORMED, TICK 'SHOW TRANSFORM CONTROL' TOOL 
5. CLICK ANY WHERE ON THE TRANSFORM CONTROL SQUARE BOX 
6.Set the ROTATION POINT to 20.00° (20 degrees)
7. HIT ENTER AGAIN;
8. HOLD Ctrl + Alt+Shift  and  Hit 'T' repeatedly...  
9. ENTER Esc. to get rid of the deselect selection.

PRACTICE  WELL AND MAKE WONDERFUL DESIGNS.
HAPPY DESIGNING.


Saturday, January 11, 2014

HOW TO MAKE A WEB BANNER


Adobe Photoshop
Adobe Photoshop is a graphics editing program developed and published by Adobe Systems its used by professionals, experts and novices alike.  


 WEB BANNER / BANNER Ad.


   BEGINNERS' TUTORIAL


A Web Banner or Banner Ad is a form of advertising on the Web delivered by an ad server.
This form of online advertising entails embedding an advertisement into a web page. It is intended to attract traffic to a website by linking to the website of the advertiser ...
Depending on how the user used, a banner is either a graphic image that gives the name, identity of a site or is an advertising image, the different is like a Paper Rose and a Rose.    

(The Natural Rose is not just a flower to decorate your room, give to someone you love or make your garden look beautiful. Rose is a medicinal herb, and many herbal remedies can be extracted from rose petal, root, stem or leaves so do the different between a Web Banner and Just a Banner).
    
A web banner is a typically rectangular advertisement placed on a Web site either above, below or on the sides of the Web site's main content and is linked to the advertiser's own Web sites in world wide web.
Banner ads are usually relatively simple pieces of HTML code, but their presence on the Web and their importance in Internet-based business is immense.
   
Ads bring money to the ad promoter as well as to the advertiser.
   
In this tutorial you will learn, 
How to create an advertisement banner,

   In Three steps...                                   

HOW TO DO A WEB BANNER
HOW TO DO A BANNER AD                                        
             (Web Banner or Banner ad.)

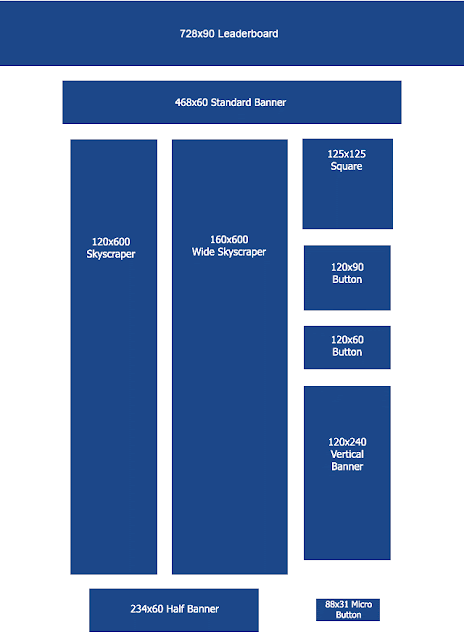
             There're different sizes in Web Banners.

                      
                                               Standard Size for Web Banner.
 ( Fig.1 )   


"HOW TO EARN BY WEB BANNER DESIGNING" on WORLD WIDE WEB (WWW.)
     
How to do a Banner Ad / Web Banner...          

                      PREVIEW OF FINAL RESULT.  ( 468pxl x 60pxl  size Web Banner)

( Fig. 2 ) 


STEP - 1...THE BACKGROUND

Like in our previous Tutorial " how to do a Banner"  open Photoshop > File > New > 


    ( Fig.3 ) Width,Height,Resolution


  • ​​Name -         Give a Name to Your image.                                                                                                        
  • Size -           Allows you to predetermine the width and height of your image. Here I have taken a standard Banner Size 468pxl x 60pxl  ( pixels) for a Web Banner normally it will stand in the middle Horizontal.  I have preset the dimensions for size your image Photoshop offers preset dimensions for sizing your image.                                                                                                                                                                                 
  • Resolution - allows you to set the image resolution. A resolution of 72 ppi (pixels per inch) is generally used for Internet images.                                                                                                              
  • Color Mode - allows you to control the color mode of your image. The standard color mode is RGB (Red Green Blue).                                                                                                                                           
  • Background Content (*2) - allows you to choose the initial background color of your image.

    ( Fig.4 )  Background Layer

   
A tiny Canvas in the middle, how to do all the designing in this Ribbon?
This is the 100% Image size of the Canvas.
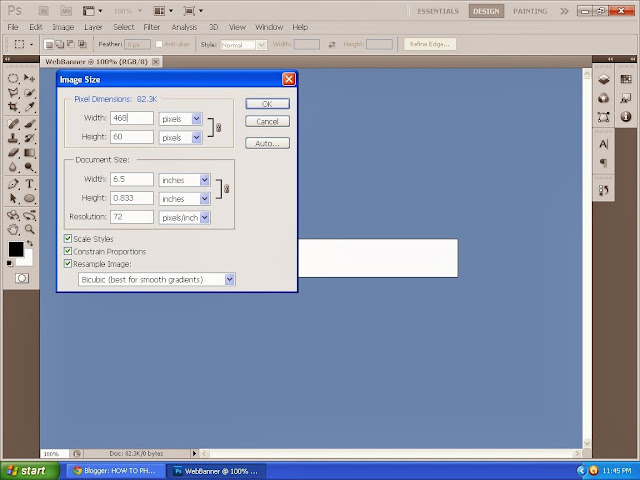
Go to Image menu click Image size, you can get details of this canvas. (below the Image size stats you will find Canvas Size, just ignore for now)


  ( Fig.5 )  IMAGE SIZE - DIALOG BOX IN THE IMAGE MENU. 

Tiny Canvas, 100% Image size all this you can just by-pass if you know how to Roll your Mouse Wheel.
You can (Zoom) increase the Image size unto your working environment enable you to happily conduct your project - Web Banner.

TRY TO INCREASE (zoom) THE CANVAS SIZE FOR A PROPORTIONAL WORKABLE AREA. DO NOT GO BEYOND A MINDFUL BOUNDARY.

Color the Background ...follow previous Lesson    Go to       How to make a Banner Photoshop


STEP - 2...


SELECTING COLOR 


Before select color and  do all the above mentioned  we need some planning to do, 
How to arrange, and what to DESIGN on the Banner.

But since we're creative beginners planning we can put aside.

Practise again and again, then no need to arrange drafts and plans -  automatically your mind will be set to work through Photoshop for a professional graphic design. 


Zoom Canvas

The Left top ribbon gives three information:     

1. The Name of the Document (here WebBanner) 
2.@ the Size (100%) ratio 
3. within bracket ( Color Mode / bit 8.)

This information is not so vital but the size ratio,  you got to look for it.

    ( Fig.6 ) Canvas Size


   Zoom the size of the Canvas, as said above by the mouse wheel... 

   
   I've brought it to 161% , don't worry the actual size remains the same 
   (std Banner Size 468pxl x 60pxl)
  
     ( Fig.7 )  Zoom Canvas


      Background Color 
    
   you can color background in many ways.

    1.      file > New  dialog box.(*2)
             ' Background Contents'  Click arrow   Drop-down menu >
              Select  'Background Color'
              Set Foreground Color  to Black (give any color you prefer)

             ( Fig.8 ) Background Contents


2.  Go to Tool Bar > Color Picker > select color 

                                   ( Fig.9 )  Color Picker        
Select Black 


Now the Layer will turn into Black (Layer 0)
watch the Layers Palette - if Layers palette not on the right side visible on your window,
bring the layers palette out from Hidden inside Window Menu...

Click Window on the Menu Bar Top > drop-down menu > Select Layers


LAYER PALETTE

The Layer palette will pop up to your right.
Learn how to set and adjust the Layers Palette, if hinders your work.
Try to drag arrange in a suitable place...

Try to learn, if gone wrong, no worry you're your teacher..

    ( Fig.10 ) Foreground Color


   The first Layer is Set... 
   How to Add more Layers?  Why?


Well !  Because...You're about to experience what're these...

                            Sheets... 
 
                      STACKS...:


Layers can't be bundled but it can be Grouped for different reasons.


Here are our Layers stack, have a look and see how its been arranged. 


( Fig.11) The 8 Layers
                              
Layer 0                                              L1

Layer 2                                               L2

Feathers                                              L3

Web                                                   L4

Banner                                                L5

Designer                                              L6

Models                                               L7

Logo                                                  L8


                                          Merged all layers


(HOW TO MERGE LAYERS...   STEP BY STEP TUTORIAL)


BACKGROUND CONTENTS...

Before we study about  Stacks of Layers  lets see what's underneath.
Go back to ( Fig.8 ) Background Contents.
                                                                  Background Contents  =    White
                                                                                                               Background Color
                                                                                                               Transparent 


You can have Background filled by one of the above Three selections.

In this Tutorial I have selected Transparent Background.(Chess Board Layout)

If you select White - Background will be filled with white color.

If you select Background Color- whatever color got in the default Background box in the Tool menu will be get filled. (Fig.11a)

No worry!!!! whatever the default color you carry on.
Go according to this Tutorial.


                                          (Fig.11a)


    There are Three rules governing Background Layer. 
    
 1.  We Can’t Move The Contents Of A Background Layer
 2.  No Transparent Pixels
 3. We Can’t Move The Background Layer Above Another Layer
                                          
                                                
  IF YOU TRY TO DO ANY BOO BOO AGAINST THE ABOVE RULES, THIS TINY 'NO-GO'
  ICON WILL BLOCK YOUR ATTEMPT.

 ALL THE OTHER LAYERS CREATED WILL  go go WITH YOU but background layer.

HOW TO UNLOCK BACKGROUND LAYER...

By default the background layer is locked

1. When you open up a new document, "background" by default will automatically be locked, so when you duplicate it, it will be locked as well.
Just double click on the locked background layer in your layer palette and you will get a dialogue box prompting you to rename the layer.
Name it, a nick name to remember its features / characteristic (except the word background) or accept the default name "layer 0" : then click OK
You layer will now be unlocked. The Padlock icon hanging around will disappear.

2. To Rename just click on the default name it'll allow you to Type a New Name
(now Background ) (use backspace key) and type a Name.
Note: if you're confused on this subject just leave as it is, once you
acquainted - it would be a Toy game.


Fig (12)


We were  ready with Background Color Black given above (Fig. 10) 

                                (Fig.12a) 

Now the Background Layer Colored with Black

The second thing is to vitalize  the remaining ideas in our mind to bring out the substances to attract our Client's potential customers on Web

Make the Banner very simple, smart  and attractive.
------------------------------------------------------------------------------------------------------------

STEP - 3...

                       How to use brush for designing...    
                       
   
This Layer was done very simple by take a brush from Brush Menu.
Open a New Layer (click layer icon down in the Layer Platte)
Name the Layer (any Name you like).
Ctrl + T or make a selection by click on the Move tool (press V) option and the tool bar underneath the menus shows a tick box with Show Transform Controls. Tick it.
Fig 13


You will see the outline with the eight boxes on the outside and the center of rotation in the middle.

Hover over them and they will change icon to show you what they do. Holding shift or CTRL or alt will give you more options.

Drag to Left edge.

Try to leave about 1 mm. for boarder all  four sides.

Adjust the stamp size brush initially while its in the right side corner before you pull and drag to left, here where you should leave space for boarder, just look at the eg. Layer down.
                                 
                                                                L2

                                                                L3

                                                                           
How to select a Brush:
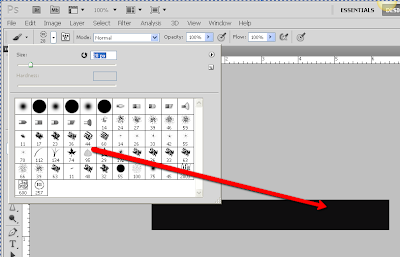
Click Brush Tool> Brush Preset
(on the top left)


Images could be turn into brushes (refer*1) , 
I have differentiated color and size in the following Image.
Just altering the size and color you can do wonders with brush.

                GO DOWN FOR FURTHER DETAILS - HOW TO DO BRUSH (*1)
   fig 14
fig 15

This is the TOGGLE THE BRUSH PANEL  looks like a Flower Vase, it appears when you click the Tool Brush Menu on the Menu Bar. look at (Fig-14)


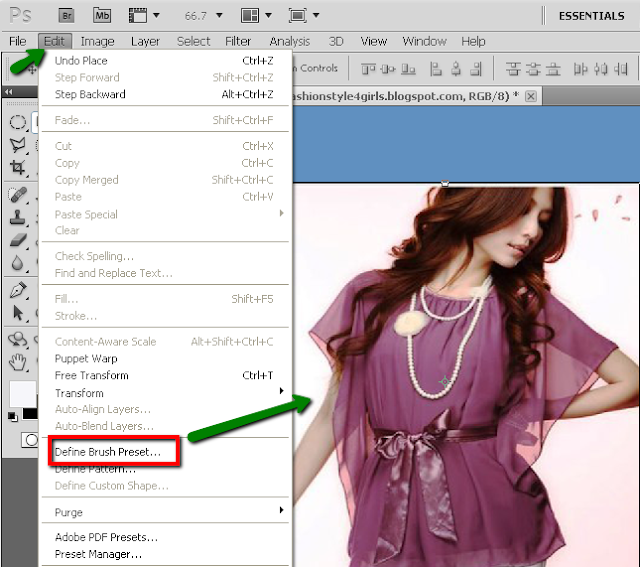
* bring an image to document, go to Edit > drop-down menu> select DEFINE BRUSH PRESET automatically image will go into to the Brush palette (Black and White) and settle,
when ever you like you can just select and give a color size it according to your need and use.

There are hundreds of Web sites offering free Photoshop brushes, layer style effects, actions, shapes, patterns, gradients, and color swatch sets.

Photoshop brushes makes it easy to insert graphics into your artwork
Designers create the brushes for you so that you don’t have to go through the hassle of making your own graphics. 
                                                      HOW TO MAKE BRUSH
                                   (we will deal with this in detail in coming chapters)
   
Select a brush from Preset Box
Fig 16

   
You can get a bit of a summary HOW TO DO A BRUSH  in this same page down          

The above Brush I created from Brush Stock Feathers= downloaded from a website inserted in to my Brush Platte as given above..
             BUT YOU DON'T BOTHER TO DO THAT NOW
            YOU JUST CLICK A BRUSH from the Brush Platte (LOOKS FLOWERY OR A FLORAL                       DESIGN )  
            CLICK AND bring the courser to the New Layer you created > Click again on that layer.
             Sometimes the Brush will look like a Giant hollow Screen, not to panic, you can reduce the size.
             Adjusting the Brush
             the easiest way to sizing is - 
             1. Click the arrow down in the Brush Preset Picker drag the button to left;
             2. the most simple method- Key-board shortcut-  just press and hold these keys to 
                                                                                                                              enlarge or  shrink                                                                                                                                     the brush.
                                          Fig 16a 


Now the Brush Design with the color you chose on the Layer.
Now click Transform controllers
                                          Fig17
        

Just jump on to 'Layer Web'

             LAYER WEB                                                 L4
             

This Layer is much easier,  just select Font,
'T' tool  type the word you like.
You know how to select the color for the font.  

         Layer BANNER                                             L5
                    

So do the same for the BANNER LAYER.
Arrange ideal position for each name or word.
From this instant your creation will enlighten and illuminate,
be creative.
        Designer Layer                 L6
         

do the same as what you've done in your previous Font Layers
only change Font style.
Select any Fancy fonts from the 'SET THE FONT FAMILY - BOX
Ctrl.+T to transform , turn in the 65 degrees direction.

NEXT LAYER
      Layer Model
         
Lovely, Beautiful, glamorous Layer of all, 
Model Layer (L7)
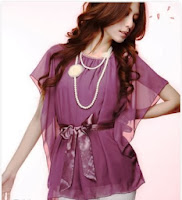
To beautify this Layer I have downloaded an Image of a Model from  Google Image

   ............................................................................................................................................                    
*1
HOW TO DO BRUSH IN PHOTOSHOP...
before we go to Layer Model, we'll learn how this Brush is made...?

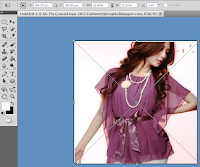
Download an Image.                         Open in Photoshop Document
       

Click Edit :(drop down menu, select) > Define Brush Preset

Fig.18
 

Fig.18a
the following Flyer will ask to NAME your Brush > OK

She has gone and settled with all  Brushes, 
 Click Brush in the Tool Menu 
Click the arrow in the Menu Bar, she'll appear back
 black&white figure inside a tiny Box
She now merely turned in to a brush.
Exploit her well
Go back to :

Select a brush from Preset Box  ( Fig 16)
and do the same rituals again.
Fig. 18b 

Fig. 18c


Stamp (place)  the brush  on the Layer in an ideal/suitable place.
Better, place on the right side corner allow other layers to display well.
.....................................................................................................................................................

Almost the Sequence of processing of the Graphic is over,  we're in the tail end.
Only we got to arrange these Models for the Cat walk.
    Arrange the Brush (Model Layer) in a proper, methodical spot and take in different colors and place             thrice.
   
   If you are still doing mistakes not to worry... 

   Making mistakes simply means you are learning faster. ~Weston H. Agor

    Go back again to correct your shortfalls. I have given in details above.
    Initially it would be an agony 
    once you pick-it-up as I said its a Toy game.

  Now the Last Layer the Tail end.

  Logo
 DOWNLOAD A LOGO FROM INTERNET.
  
 Download a Logo Image in to your computer. Open it into to your Photoshop document.
 Do the same process again as you did on other three layers, Making Brush - Photoshop.
 Go back and refer the sequence of Brush Making in Photoshop.
 Turn out the Logo in to a Brush, I have given a White color to the Logo Brush.
 Click  the Logo Brush where ever you prefer best.


    Fig-19

  Now the Layers in your Photoshop document would Stand as in the Diagram above (Arrow marked).
  The Top Layer BCS on the Top- 
 The Second Top (brush) Designer Layer (in this fig.19, while editing for the web mistakenly given as-        Brush) and the stacks goes on - the Last Black layer underneath is the background Layer.

Now if you intended to change the positions of the Layers  you can do it -but here you have done in order,
no need to alter. 


...................................................................................................................................................................

Now what to do with these Stacks of Layers?
Save it!  Where?
How by all-together or one by one.
Lots of questions will enter your mind.

WHAT WAS THE PURPOSE OF OUR PROJECT OR THIS MISSION.
After all we're beginners we had no mission in our mind but to learn Photoshop.
Any way we got to finish this Banner design.

Now what is left,  your Banner to be saved in a safe place (as a PSD/JPEG FILE ),
to take back and publish, dispose to a potential customer or to retrieve (if the file in .PSD format you can  edit or modify).
To do all well we need little more work to be done.

How to Flatten and save your Document, please go to my  next Post.

TO FINISH THIS YOU GOT TO SAVE.
SAVE, all your Layers will be intact in Photoshop (PSD) file format.
but you will not able view your finished work but in Photoshop Program.
Enable you to view in JPG,
...................................................................................................................................................................
HOW TO MERGE LAYERS IN PHOTOSHOP- LAYERS...

WHAT IS MERGING IN PHOTOSHOP...

HOW TO FLATTEN IN PHOTOSHOP- LAYERS...
WHAT IS FLATTENING IN PHOTOSHOP...

HOW TO LAYER ARRANGED IN PHOTOSHOP AND SAVE                                              
HOW TO SAVE FINISH PHOTOSHOP DOCUMENT
And More Next...
                                               
MERGING LAYERS IN DETAILS


30% off New Products at GoDaddy.com!